
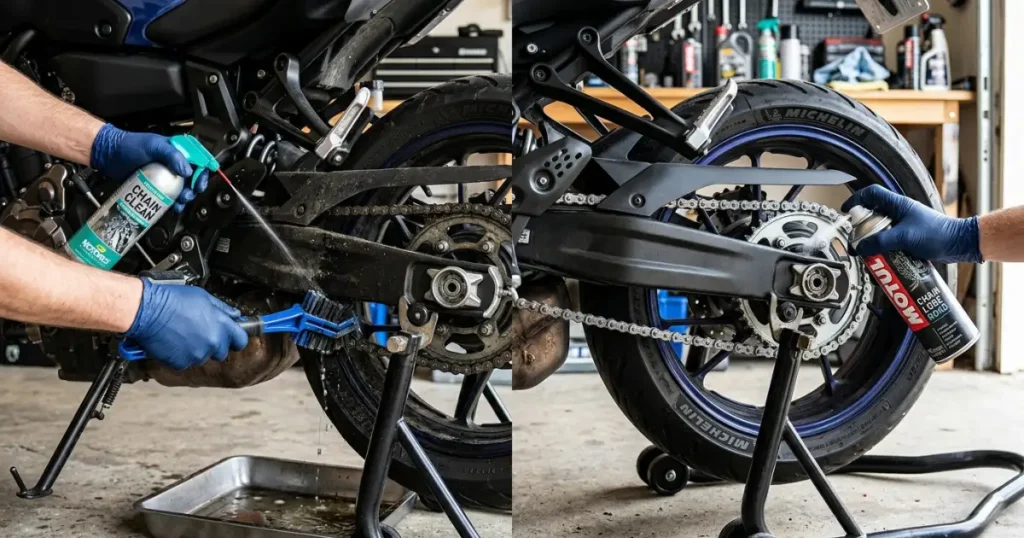
How to Clean and Lube Your Bike Chain at Home: Maintaining a motorcycle is one of the most rewarding aspects of ownership. Among all the routine maintenance tasks, taking care of your bike’s chain drive is arguably the most crucial for safety, performance, and longevity. A dry, gritty, or loose chain not only saps engine power and drops fuel efficiency, but it also risks snapping mid-ride—which can cause severe mechanical damage or an accident.
Thankfully, cleaning and lubricating your motorcycle chain is a straightforward DIY job that you can easily perform at home in under 30 minutes. In this comprehensive guide, we will break down the exact tools you need, the safety precautions to take, and a step-by-step framework to keep your drivetrain running smoothly.
Why Regular Chain Maintenance Matters
Your motorcycle’s chain operates in a harsh, exposed environment. As you ride, the sticky lubricant on the links acts like a magnet for road grit, dust, mud, and sand. This mixture forms a highly abrasive grinding paste that wears down your chain’s rubber O-rings, X-rings, and sprocket teeth.
Regularly performing this maintenance task every 500 to 800 kilometers provides several direct benefits:
- Extended Component Lifespan: A well-maintained chain and sprocket kit can easily last over 20,000 kilometers, saving you money on expensive replacements.
- Smoother Power Delivery: Eliminating tight links and grit ensures seamless throttle transitions and crisper gear shifts.
- Improved Fuel Mileage: Reducing friction in the final drive means less engine load, maximizing your kilometers per liter.
How to Clean and Lube Your Bike Chain at Home: Essential Tools Checklist
Before getting your hands dirty, gather these essential supplies next to your motorcycle. Avoid using makeshift cleaning agents like petrol or diesel, as they can permanently deform and destroy the delicate internal rubber seals of your chain.
| Tool / Supply | Purpose | Why It Is Crucial |
| Paddock Stand / Center Stand | Vehicle Elevation | Allows you to rotate the rear wheel freely by hand. |
| Dedicated Chain Cleaner Spray | De-greasing | Safely dissolves old grime without hurting rubber O-rings. |
| Three-Sided Chain Brush | Scrubbing | Cleans all three exposed faces of the links simultaneously. |
| Premium Chain Lube / Paste | Lubrication | Protects metal components from friction and moisture. |
| Clean Lint-Free Rags | Wiping | Removes residual solvents and lifting dissolved sludge. |
| Cardboard Sheet | Overspray Shield | Prevents grease from staining your tyre, brakes, or floor. |
Strict Safety Warning: Never Turn the Engine On!
CRITICAL SAFETY RULE: Never, under any circumstances, start your motorcycle’s engine and put it in gear to let the chain spin while cleaning or lubing. This is an incredibly dangerous practice that has caused many riders to lose fingers in the rear sprocket. Always rotate the rear tyre completely by hand with the engine turned off and the ignition key removed.
How to Clean and Lube Your Bike Chain at Home: Step-by-Step Chain Maintenance Process
Step 1: Elevate the Rear Wheel
Place your motorcycle on its center stand. If your bike only features a side stand, use a secure rear paddock stand or a portable wheel roller. Ensure the bike is parked on stable, level ground, and shift the transmission into Neutral so the rear wheel rotates smoothly with minimal effort.
Step 2: Set Up Your Overspray Protection
Slide a large piece of cardboard or old newspaper underneath the lower chain run and behind the rear sprocket area. This setup creates an effective barrier that prevents degreaser chemicals and flying oil mist from contaminating your rear brake disc, brake pads, or tyre tread.
Step 3: Spray the Chain Cleaner Solvent
Generously spray a high-quality, O-ring-safe chain cleaner across the entire length of the chain. Shake the wheel slowly by hand to coat every single roller, link plate, and side pin. Let the chemical solvent soak into the old grime for 3 to 5 minutes to thoroughly dissolve the hardened grease matrix.
Step 4: Scrub All Four Sides
Take your three-sided cleaning brush and lock it onto the lower run of the chain. Rotate the rear wheel back and forth to scrub away accumulated dirt. Flip the brush over to thoroughly clean the inner side pins and rollers. For stubborn buildup around the front and rear sprockets, use a stiff-bristled utility brush to loosen the mud cake.
Step 5: Wipe Away Dissolved Residue
Take a clean, lint-free microfibre rag or heavy-duty shop towel and wrap it tightly around the lower chain run. Manually spin the wheel to pull the chain through the cloth. You will see an immediate transfer of dark, emulsified sludge onto the fabric. Repeat this wiping cycle with a clean section of the rag until the metal link plates look bright and dry.
Step 6: Apply the Chain Lubricant
Allow the remaining cleaning solvent to fully evaporate for 10 minutes so it does not dilute your fresh oil coat. Hold your premium chain lube spray can steady and target the inner run of the chain right where the rollers meet the sprocket teeth.
Slowly rotate the rear tyre by hand, spraying evenly along the inside edges. This method uses centrifugal force to naturally push the lubricating fluid outward into the internal rollers and rubber seals as you ride, rather than spinning it off instantly.
Step 7: Wipe Off the Excess Lube
After completing two full rotations of even coating, let the lubricant settle for a couple of minutes. Take a fresh cloth and lightly wipe down the outer link plates. You only need the lubricant on the inner rollers and hidden rubber seals; leaving excess wet oil pooling on the outer face will only attract road debris and spray onto your riding gear.
When to Replace Your Chain: Inspection Metrics
While cleaning, take 60 seconds to inspect your drivetrain for structural wear limits. If you notice any of the following technical red flags, it is time to purchase a new chain and sprocket set:
- Seized or Kinked Links: Links that remain bent in an “V” shape even after deep cleaning and lubrication mean the internal pins are rusted or starved of grease.
- Sprocket Teeth Hooking: If the teeth on your rear sprocket look sharp, pointed, or curved like a shark fin, they are severely worn down and will damage a new chain.
- Excessive Play / Stretching: Pull the chain directly backward from the rearmost edge of the rear sprocket. If you can pull it back far enough to expose more than half a sprocket tooth, the chain has stretched beyond its safe operational tolerance limit.
Conclusion
Spending 20 minutes every few weeks to clean and lube your bike chain at home keeps your motorcycle responsive, fuel-efficient, and inherently safe. By using dedicated cleaning solvents, setting up clean cardboard shields, and always rotating the tyre manually, you protect your machine’s drivetrain components from premature failure. Keep your tools handy, monitor your link tension limits regularly, and enjoy the smooth, quiet ride on the open road!